![Logo_Trinnov_Black_CMJN.png]](https://kb.trinnov.com/hs-fs/hubfs/ISE%202024/Logo_Trinnov_Black_CMJN.png?height=50&name=Logo_Trinnov_Black_CMJN.png)
Target Curves & Excursion Curves
Understanding Their Role in the Trinnov Optimizer
Summary:
Overview
Target Curves and Excursion Curves are key components of the Trinnov Optimizer’s correction engine. Together, they determine how the system shapes the listening experience while maintaining speaker safety and preserving natural sound quality.
- Target Curves define the desired acoustic response the Optimizer aims to achieve.
- Excursion Curves define the maximum correction limits (boost or cut) the Optimizer is allowed to apply at any frequency.
A clear understanding of both—along with how they interact—is essential for effective calibration and system protection.
1. Target Curves
What Is a Target Curve?
A Target Curve is a user-defined frequency-response shape that the Optimizer uses as a reference when applying corrections. Put simply:
The Target Curve represents the frequency response you want the system to produce.
By default, the Optimizer is set to a flat response. However, it is expected that a Target Curve will be applied during the fine-tuning stage to shape the final tonal balance.
Important: Having a flat Target Curve immediately after calibration helps view the loudspeaker’s predicted performance before shaping the final tonal balance.
Why Target Curves Matter
1. Control of Tonal Balance
Target Curves allow the calibrator to:
- Add bass warmth
- Adjust midrange presence
- Shape high-frequency tilt
- Achieve system-wide tonal consistency
2. Real-World Listening Expectations
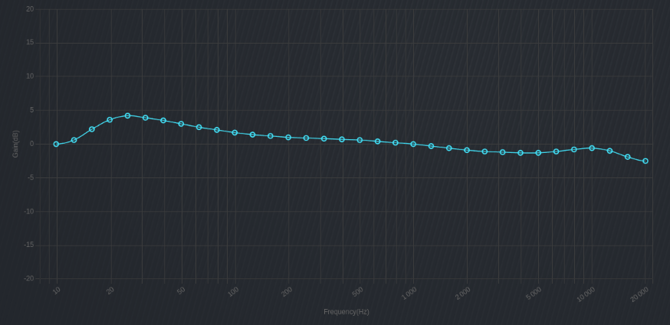
Most professional studios, commercial cinemas, and high-end listening rooms do not use a flat target. A gentle downward slope from bass to treble typically produces the most natural and subjectively pleasing result. The image below shows the Musical Target Curve, which is a predefined Target Curve for Trinnov.
Built-In Target Curves
Trinnov provides five preconfigured curves:
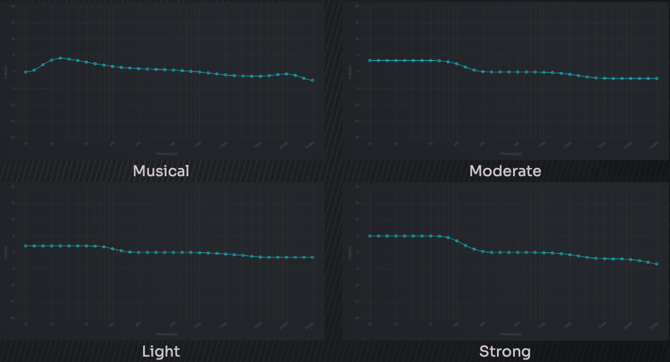
- Flat
- Musical
- Light
- Moderate
- Strong
These curves are based on many years of Trinnov experience. However, they can also serve as starting points and be adjusted as needed, or a custom curve can be created.
Note: All Target Curves operate within the correction limits defined by the Excursion Curve.
Accessing the Target Curve Page
- Click Optimizer at the top left of the interface.
- Select the Optimizer icon from the menu.
- Navigate to the Target Curves tab (second from the left).
From here you can view, edit, and manage Target Curves.
Target Curve Control Panel
In Expert Mode, the right-side control panel provides three functional areas:
1. Speakers
- Speakers can be linked or unlinked.
- Groupings: Fronts, Surrounds, Subs.
- Linking allows applying the same target across a group.
- Unlinking allows individual speaker adjustments.
- When WaveForming is active, only Sub 1 supports Target Curve editing.
2. Graph
Displays the frequency response of the selected speaker. You may view Before, After or Both. This view is helpful for identifying problematic frequencies before shaping the target.
3. Manage
Allows you to Save, Import, and Export Target Curves
Creating Custom Target Curves
To create or edit a Target Curve:
- Enable Expert Mode (toggle in upper right).
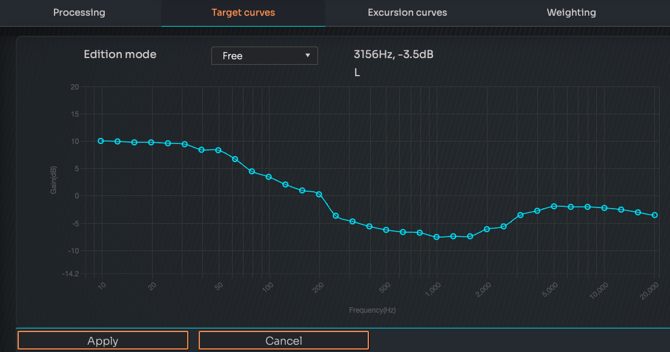
- Use the drawing tools:
Free Mode |
Segment Mode |
|
|
 |
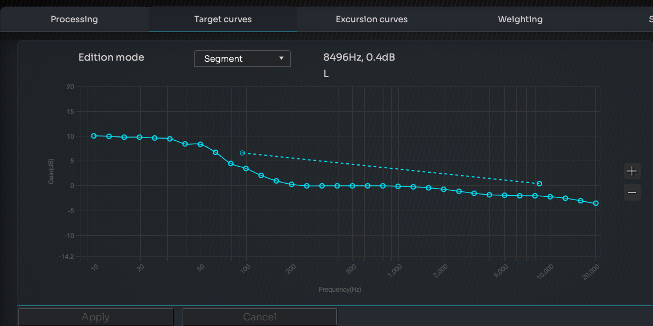 |
A real-time readout (frequency and gain) appears next to the editing tools for precision adjustment.
Each dots can be adjusted using a keyboard.
- Select the EQ dot with the left and right arrows.
- Increase/ Decrease the gain value with the up and down arrows. By default, the steps are 1dB. By pressing on ⌥ (option) for Mac or Alt for Windows, the step becomes 0.1dB.
Important Steps
- Click Apply to activate the modified Target Curve.
- Save the Preset using Save or Save As in the top-center preset menu.
2. Excursion Curves
What Is an Excursion Curve?
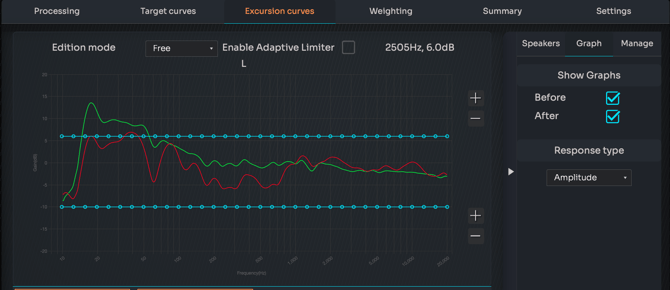
An Excursion Curve defines the maximum level of correction the Optimizer can apply—both boost and cut—at each frequency.
It acts as a safety boundary to prevent unsafe DSP behavior that could damage speakers or degrade audio quality.
Low frequencies in particular demand significant energy to boost; unrestricted adjustments can cause:
- Driver over-excursion
- Amplifier clipping
- Distortion
- Thermal stress
- Mechanical damage
Default Excursion Curves ensure safe operation for most systems.
Why Excursion Curves Matter
1. Speaker Protection
Prevents excessive driver movement, especially in low-frequency ranges.
2. Maintained Sound Quality
Large DSP boosts typically sound unnatural.
Excursion limits keep corrections realistic.
3. Amplifier Headroom Preservation
Avoids consuming unnecessary power or degrading system dynamics.
4. Diagnostic Visibility in Graphs
In Expert Mode, the Filters graph clearly shows where excursion limits are reached.
Flat regions in the filter line indicate:
- A correction “hard stop”
- Frequencies where further adjustment is restricted
Default Excursion Curve Limits
- +6 dB maximum boost
(Equivalent to approximately 4× amplifier power) - –10 dB maximum cut
Increasing attenuation is generally safe.
Increasing boost should be approached with caution.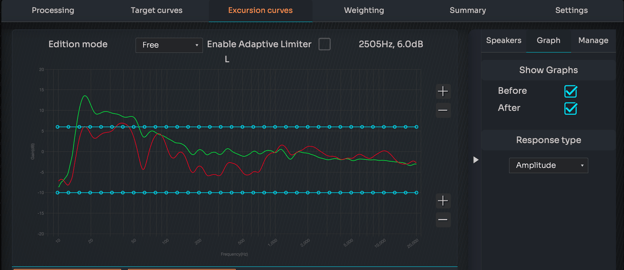
Accessing the Excursion Curve Page
- Click Optimizer at the top left.
- Select the Optimizer icon.
- Navigate to the Excursion Curves tab (third from the left).
Excursion Curve Control Panel
The control panel is similar to the Target Curve panel:
Speakers
- Speakers can be linked or unlinked.
- Groupings: Fronts, Surrounds, Subs.
- With WaveForming, only Sub 1 supports Excursion editing.
Graph
Displays:
- Speaker response
- Excursion limits
- Before/After overlays (optional)
Useful for identifying where increased (safe) correction may be required.
Manage
Allows saving, importing, and exporting Excursion Curve settings.
When to Adjust Excursion Curves
Adjustments should only be made by trained professionals and only when:
- The speaker is known to have greater headroom than assumed
- Additional safe correction is required in specific frequency ranges
- Subwoofers with high excursion capability need more boost allowance
Incorrect adjustment can cause:
- Severe distortion
- Driver or crossover damage
- Excessive cone travel
- Amplifier overload
Creating a Custom Excursion Curve
- Enable Expert Mode.
- Choose Free or Segment mode.
- Draw or adjust limits along the frequency spectrum.
- Use the Graph tab to overlay Before/After measurements for reference.
- Click Apply, then Save the preset.
Default Excursion Settings
- These settings are across all frequencies
- + 6 dB gain
- This equates to 4x the amplifier power
- -10 dB attenuation (cut)
- It does not hurt to increase the amount of attenuation if needed.
Excursion Curve Control Panel
The Excursion curves control panel is identical to the Target Curve control panel.
- Speakers - enables the linking, or unlinking of speakers. They are grouped into the Fronts, Surrounds, and Subs
- Each speaker can be linked or unlinked by clicking the checkbox
- When using WaveForming, only Sub 1 can have a Target Curve
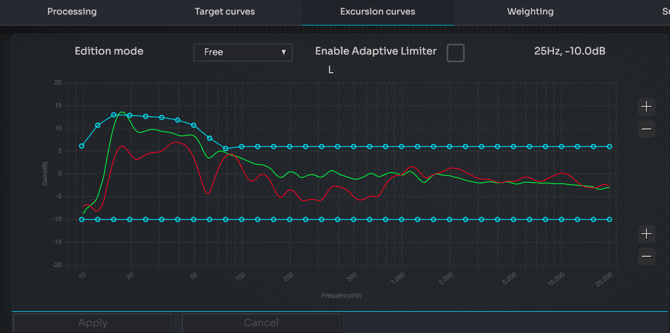
- Graph - Displays the frequency response measurement for the selected speaker and the excursion curve
- One speaker at a time
- Can see Before, After or both by clicking the checkbox
- Very helpful when establishing areas where excess excursion is needed (if it is safe to do so).
- Manage - Gives you the ability to save, import or export target curves
When Adjustments Are Appropriate
Excursion Curve modifications, particularly regarding gain, should only be made by trained professionals, and only when:
- A speaker is known to have more headroom than default settings assume
- You need to allow more boost in carefully controlled ranges
Incorrect changes can produce:
- Severe distortion
- Driver or crossover damage
- Excessive cone /drive travel
- Amplifier overload
Conclusion
Target Curves and Excursion Curves are core elements of the Trinnov Optimizer’s advanced correction engine. The Target Curve defines the desired tonal balance, while the Excursion Curve ensures safe, realistic application of correction. Together, they provide powerful control over your system's performance while maintaining protection, predictability, and sonic integrity.